How to configure postman/newman API tests in Azure DevOps
- Export the postman collection and environment
- Push the collection/environment to "Azure Repos Git" repository
- Navigate to Pipeline page in Azure DevOps and click on "New pipeline" button on the top right corner.
- Click on "Use the classic editor" link in the bottom to create a pipeline without YAML.
- Select the source for the postman tests
- Select a template > Click on "Empty job"
- A new pipe line is created with default name
- Add the tasks
- Install newman
- Newman command to run the tests
- Publish Test results
- Save the pipe line and Queue(run the pipeline)
- Analysis of Junit Report
- Analysis of published report
Let's look into each of the steps above in detail.
Export the postman collection and environment as .json files
- Create a Collection, create a GET request, write tests for the request
- Here is a sample request created : https://learning.postman.com/docs/getting-started/sending-the-first-request/
- Tests written for the above GET request are as follows
- NOTE: For the demonstration purposes, I've not taken environment for this example.
pm.test("Status code is 200 OK", function () {
    pm.response.to.have.status(200);
});
pm.test("Response time is less than 10s", function () {
    pm.expect(pm.response.responseTime).to.be.below(10000);
});

pm.test("Body contains url",() => {
  pm.expect(pm.response.text()).to.include("http://postman-echo.com/get");
});
- Collection Name : 00Test.postman_collection.json
Push the collection/environment to "Azure Repos Git" repository
- Use git commit and push the code to Azure Git repository
- Click on the image below to get the best view.

- Use git commit and push the code to Azure Git repository
- Click on the image below to get the best view.

Navigate to Pipeline page in Azure DevOps and click on "New pipeline" button on the top right corner.


Click on "Use the classic editor" link in the bottom to create a pipeline without YAML.

Select the source for postman tests
- Select the "Team Project", "Repository", "Branch" and click on Continue button

Select a template > Click on "Empty job"


A new pipe line is created with default name
Set the below basic properties and the remaining are optional and can be configured on demand basis.
Display name : Agent job1
Agent pool : <inherit from pipeline>

Display name : Agent job1
Agent pool : <inherit from pipeline>

Add the tasks
To add the tasks click on + button on the Agent job.
I am taking 3 tasks for the tests to run, they are as follows. - Install newman
- Newman command to run the tests
- Publish Test results
I am taking 3 tasks for the tests to run, they are as follows.
Install newman
Search for the command line plugin at the top right corner and then Add the command line task.

Fill the required properties for the task added, for instance, we install postman command line tool that is newman using npm package.
Display name : Install newman

Display name : Install newman
Script : npm install -g newman

The corresponding YAML script to install the newman issteps: - script: | npm install -g newman displayName: 'Install newman'
Newman command to run the tests
Add one more command line plug-in to run the postman API tests (This we can do in the previous step itself, I wanted to separate out the installation task to the test execution task so the second command line plugin).
Use below script command to run the collection
Use below script command to run the collection
Display name : Newman command to run tests
Script: newman run 00Test.postman_collection.json --reporters cli,junit --reporter-junit-export Results\junitReport.xml
Format/Syntax: Postman collection with environment
newman run <PostmanCollection.json> -e <Environment.json> --reporters cli,junit --reporter-junit-export Results\junitReport.xml

Default Working Directory format is : $(System.DefaultWorkingDirectory)

Corresponding YAML script
steps:
- script: 'newman run 00Test.postman_collection.json --reporters cli,junit --reporter-junit-export Results\junitReport.xml'
  displayName: 'Newman command to run tests'
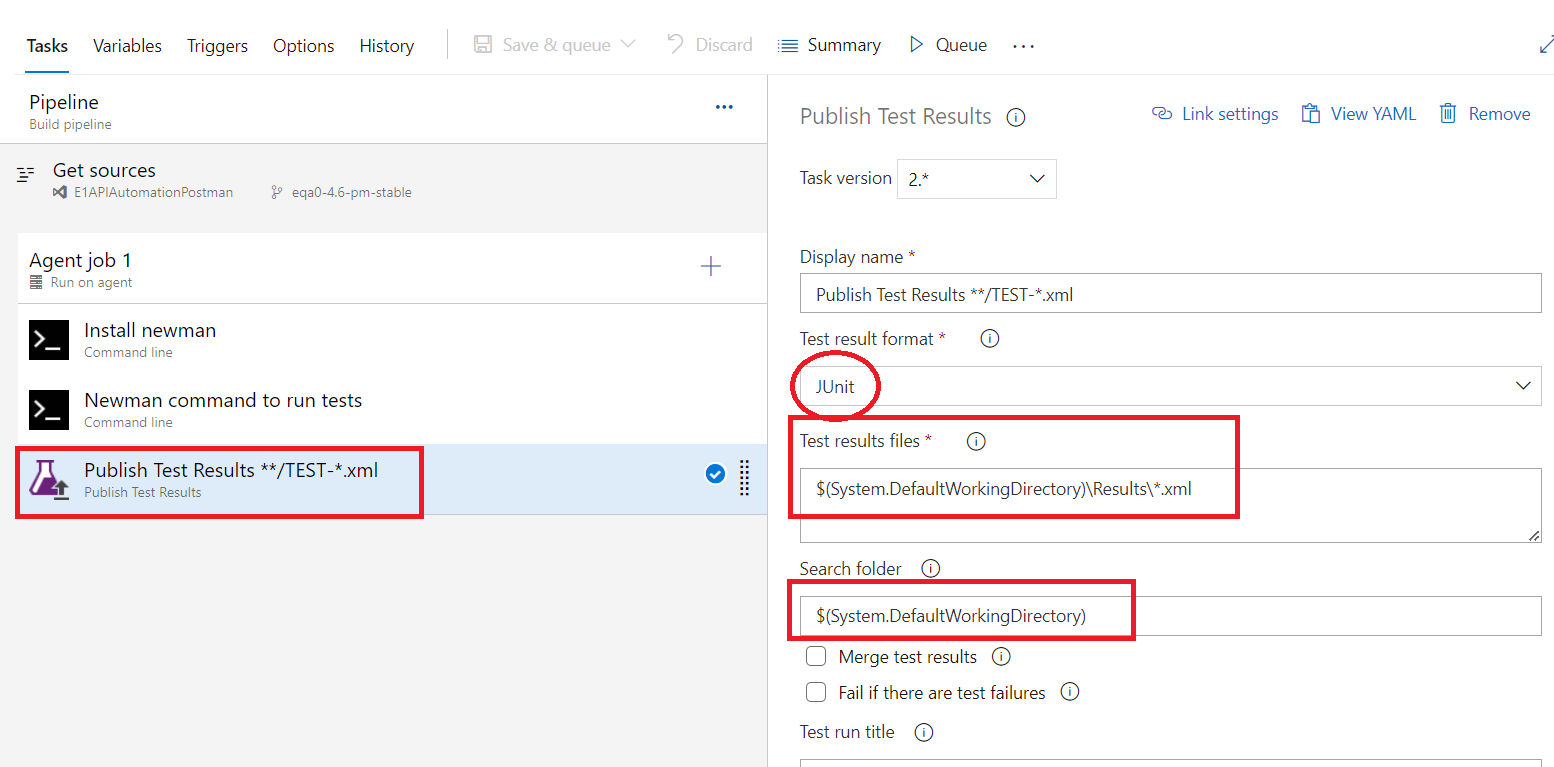
Publish test results:
- Search for Publish Test Results plugin and add it as next task for the job.
- Configure the below basic properties
- Display Name : Publish Test Results **/TEST-*.xml ( It could be any name, I used the generated name)
- Test result format : Junit
- Test results files: $(System.DefaultWorkingDirectory)\Results\*.xml
- Search folder : $(System.DefaultWorkingDirectory)

Save the pipe line and Queue(run the pipeline)
Save the pipe line
Queue and run the pipe line

As the pipe line queued we navigate to the run console of the pipe line, from this console click on "Agent job1" in the bottom which is in process.

Agent job1 displays the tasks to perform by the pipeline as shown in below image. This includes the default tasks along with the tasks configured by us.

All the tasks in the job has successfully ran so the next thing is to analyze the junit report.
Analysis of Junit Report

Queue and run the pipe line


Agent job1 displays the tasks to perform by the pipeline as shown in below image. This includes the default tasks along with the tasks configured by us.
All the tasks in the job has successfully ran so the next thing is to analyze the junit report. 
Be on the pipe line run console to view the report.
If there are any unexpected blockers while executing the tasks, the junit report will not be generated.
If there are any failures in the asserstions/tests for the postman junit report will be generated.
The report can be analyzed in the Tests tab as shown in below image.
The report can be analyzed in the Tests tab as shown in below image.

Analysis of Published Report
Click on Publish Test Results task from the pipe line execution and the console make note of the URL where the results are published. Open the URL in a new tab and start analyzing the results.


In case of any test failures, Create bug or update the result to to the test case!
This is how we integrate postman/newman API tests in Azure DevOps pipe line for the continuous integration (CI) .
I hope this helped a bit, keep an eye on this portal for more automation updates.
No comments:
Post a Comment